
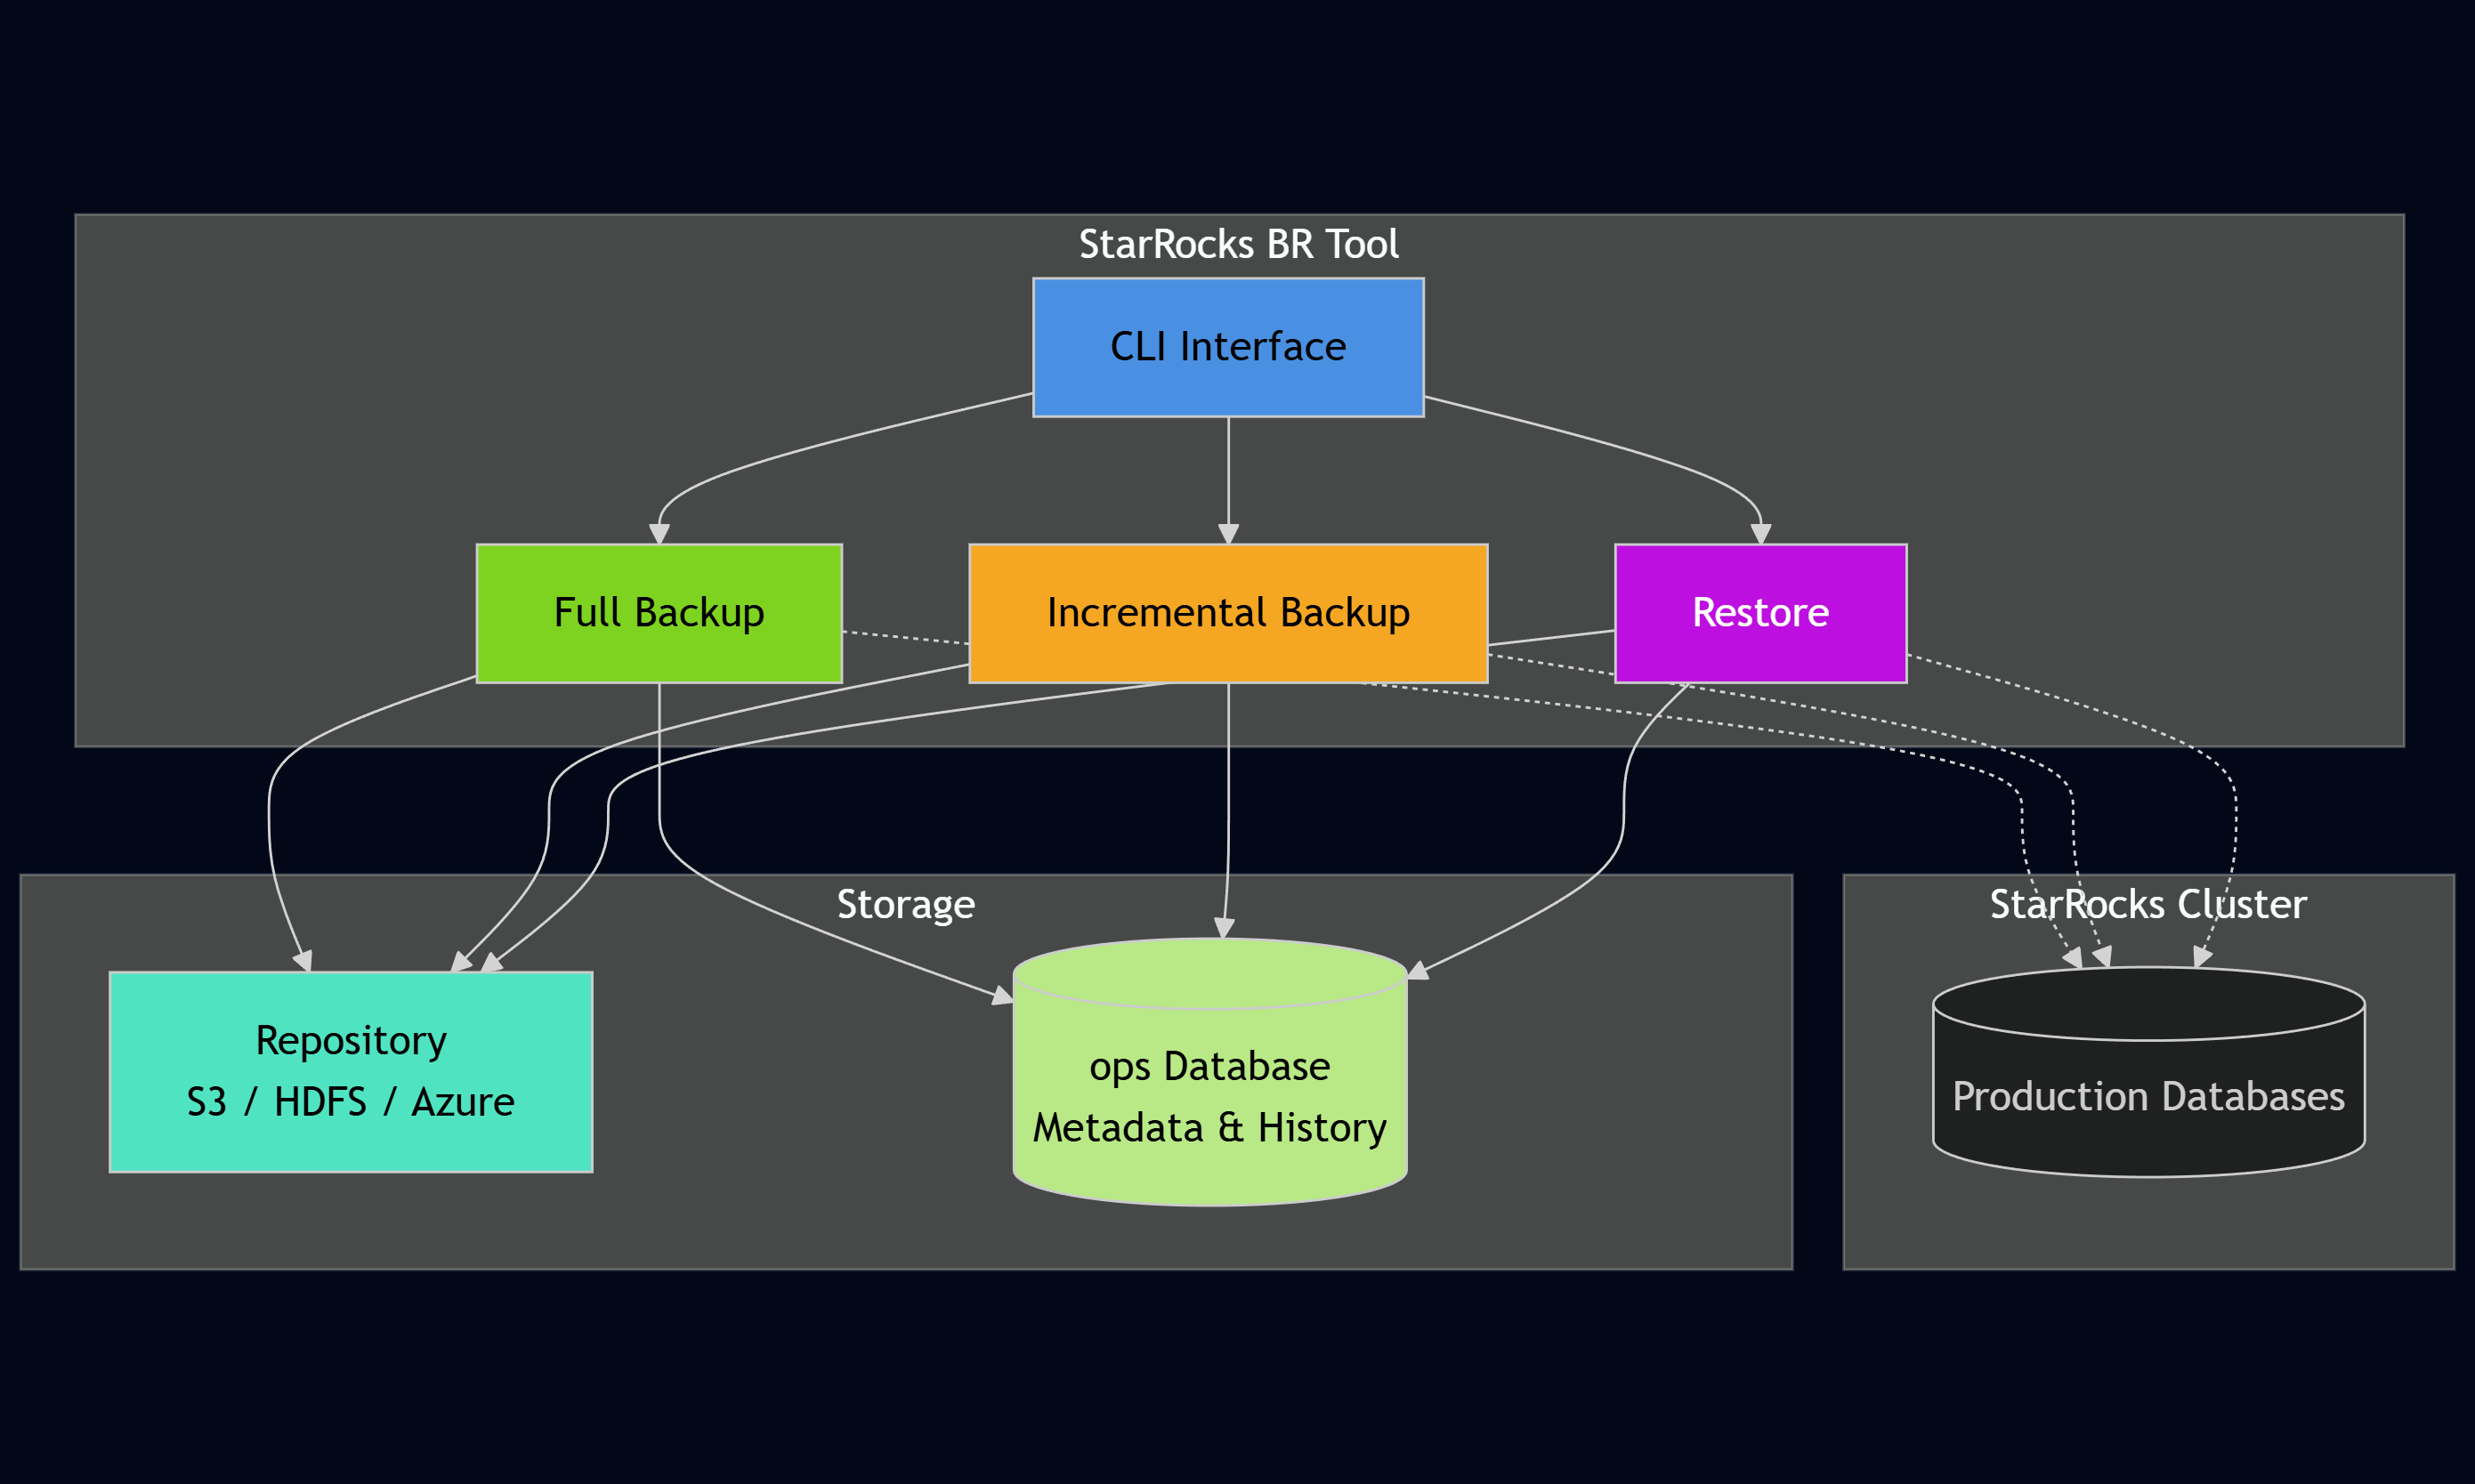
Before diving into the practical steps, it’s worth recalling why operational tooling around backups is so important for StarRocks. As deployments scale, native snapshot commands alone aren’t enough – teams need incremental logic, metadata tracking, and reliable restore workflows. In the first article, we introduced starrocks-backup-and-restore, a lightweight CLI that fills exactly these gaps by turning backups into a predictable, production-ready system.
If you haven’t read that introduction yet, you can find it here: Introducing starrocks-backup-and-restore: Production-Grade Incremental Backups for StarRocks.
Let's walk through a practical example to see how the tool works in practice.
First, install the tool via pip or download the standalone executable:
python3 -m venv .venv
source .venv/bin/activate
pip install starrocks-brBefore using the starrocks-backup-and-restore, one needs a backup repository in StarRocks. This is where the actual backup data gets stored (S3, HDFS, Azure, etc.):
CREATE REPOSITORY `s3_backups`
WITH S3
ON LOCATION "s3://your-backup-bucket/starrocks-backups/"
PROPERTIES (
    "aws.s3.access_key" = "your-access-key",
    "aws.s3.secret_key" = "your-secret-key",
    "aws.s3.endpoint" = "https://s3.amazonaws.com"
);
Create a configuration file pointing to your StarRocks cluster:
# config.yaml
host: "starrocks-fe.example.com"
port: 9030
user: "root"
database: "sales_db"
repository: "s3_backups"
Set the password as an environment variable:
export STARROCKS_PASSWORD="your_password"Run the init command to create the ops database and metadata tables:
$ starrocks-br init --config config.yaml

Initializing ops schema...

Next steps:
1. Insert your table inventory records:
   INSERT INTO ops.table_inventory
   (inventory_group, database_name, table_name)
VALUES ('my_daily_incremental', 'your_db', 'your_fact_table');Now, define which tables will be backed up. Connect to StarRocks and insert rows into the inventory table:
-- Group critical transactional tables together
INSERT INTO ops.table_inventory (inventory_group, database_name, table_name)
VALUES
  ('critical', 'sales_db', 'orders'),
  ('critical', 'sales_db', 'payments'),
  ('critical', 'sales_db', 'customers');

-- Group less critical tables separately
INSERT INTO ops.table_inventory (inventory_group, database_name, table_name)
VALUES
  ('analytics', 'sales_db', 'daily_metrics'),
('analytics', 'sales_db', 'user_sessions');Start with a full backup to establish the baseline:
$ starrocks-br backup full --config config.yaml --group critical

✓ Cluster health: All nodes healthy
✓ Repository 's3_backups' verified
✓ Generated label: sales_db_20251125_143022_full
✓ Job slot reserved
Starting full backup for group 'critical'...
✓ Backup completed successfully: FINISHED
The tool automatically generates a label, submits the backup job to StarRocks, polls for completion, and records all metadata.
After some time passes and data changes, run an incremental backup:
$ starrocks-br backup incremental --config config.yaml --group critical

✓ Cluster health: All nodes healthy
✓ Repository 's3_backups' verified
✓ Using latest full backup as baseline: sales_db_20251125_143022_full (full)
✓ Generated label: sales_db_20251125_160000_incremental
✓ Found 12 partition(s) to backup
✓ Job slot reserved
Starting incremental backup for group 'critical'...
✓ Backup completed successfully: FINISHED
Notice how it automatically detected the baseline, compared partition timestamps, and backed up only the 12 changed partitions.
Later, if there is a need to restore a table, the tool handles the complexity:
$ starrocks-br restore --config config.yaml --target-label sales_db_20251125_160000_incremental --table orders

=== RESTORE PLAN ===
Repository: s3_backups
Restore sequence: sales_db_20251125_143022_full -> sales_db_20251125_160000_incremental
Tables to restore: orders
Temporary table suffix: _restored

This will restore data to temporary tables and then perform atomic rename.
⚠ WARNING: This operation will replace existing tables!

Proceed? [y/N]: y

Step 1: Restoring base backup 'sales_db_20251125_143022_full'...
✓ Base restore completed successfully

Step 2: Applying incremental backup 'sales_db_20251125_160000_incremental'...
✓ Incremental restore completed successfully
The tool automatically resolved that it needs both the full backup and the incremental, restored them in the correct order, and used a temporary table so one can verify the data before swapping it into production.
Query the metadata database at any time to see your backup history:
SELECT label, backup_type, status, finished_at
FROM ops.backup_history
WHERE label LIKE 'sales_db%'
ORDER BY finished_at DESC
LIMIT 5;
This gives complete visibility into all backup operations, their status, and when they are completed.
In just a few commands, you've:
For teams already running StarRocks in production, the migration path is straightforward. Create inventory groups for your existing tables, run a full backup to establish a baseline, then switch to incremental backups going forward. The metadata database tracks everything from that point on.
For new deployments, one could incorporate the starrocks-backup-and-restore from day one. Define the inventory groups alongside the data models, schedule backups as part of the operational playbooks, and build confidence in your disaster recovery processes before they are needed.
With just a few commands, you can turn StarRocks backups into a reliable, automated system. The starrocks-backup-and-restore CLI makes it straightforward to define inventory groups, run full and incremental backups, and restore individual tables with precision—all backed by a metadata layer that provides full visibility into your backup history.
Whether you’re migrating an existing StarRocks deployment or setting up a new one, adopting this tool ensures your backup processes are consistent, auditable, and production-ready from day one. It’s an easy way to strengthen operational resilience without adding complexity.
To dive deeper, explore the repository, review the documentation, and start testing backups and restores in your environment.

